ComfyUI now includes support for three new series of models from Black Forest Labs, specifically designed for FLUX.1: Redux Adapter, Fill Models, and ControlNet Models with LoRAs (Depth and Canny). These powerful additions enable users to achieve precise control over details and styles in image generation, enhancing creative possibilities.
Here’s an overview of the newly supported models and their features:
Overview of FLUX.1 Models
1. FLUX.1 Fill [dev]
Designed for tasks like inpainting and outpainting, this model excels at seamlessly modifying images based on input masks and prompts.
- Input Requirements: An image, a black-and-white mask (same dimensions as the image), and a text prompt.
- Features:
- Inpainting: Fill missing or removed areas in an image.
- Outpainting: Extend an image beyond its original boundaries.
- Enhanced CLI Support: The CLI can infer the output dimensions automatically based on the input image and mask.
2. FLUX.1 Redux [dev]
A lightweight adapter for generating image variations without needing a prompt.
- Input Requirements: An image.
- Features: Produces visually similar variations of the input image.
- Compatibility: Can be used with both “dev” and “schnell” modes.
3. ControlNet Models
These models leverage additional conditioning inputs to refine image generation.
- ControlNet Depth [dev]: Uses depth maps for conditioning, adding realism and depth to images.
- ControlNet Depth [dev] LoRA: A specialized LoRA designed to work with FLUX.1 [dev] for depth-based conditioning.
- ControlNet Canny [dev]: Employs canny edge maps for conditioning, enabling precise control of edges and structures.
- ControlNet Canny [dev] LoRA: A LoRA model to complement FLUX.1 [dev] for edge-based conditioning.
How to Get Started
1. Setting Up FLUX.1 Fill Model
The Fill Model is a powerful tool for seamless inpainting and outpainting tasks.
- What You’ll Need:
- An updated version of ComfyUI.
- The following dependencies:
clip_landt5xxl_fp16models in themodels/clipdirectory.flux1-fill-dev.safetensorsin theComfyUI/models/unetfolder.
- Example workflows, such as
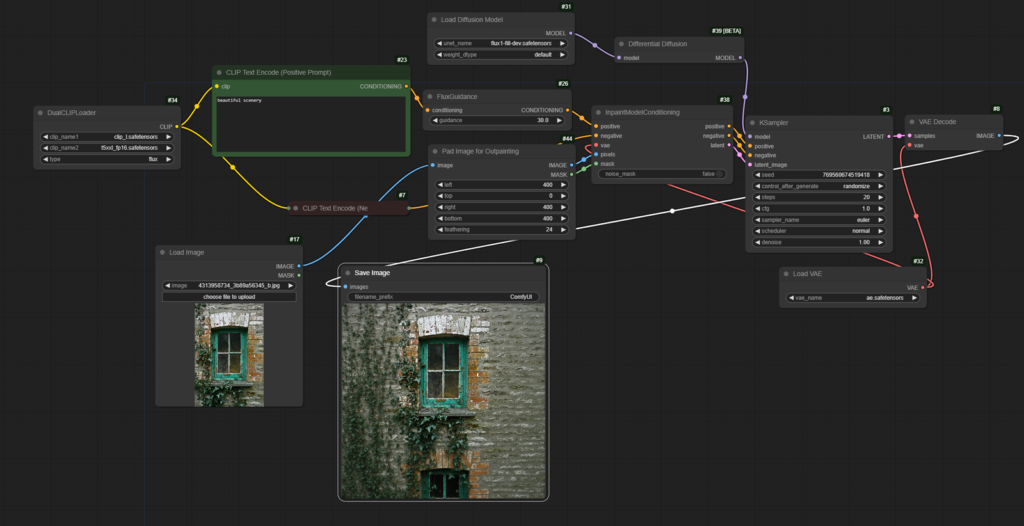
flux_inpainting_exampleorflux_outpainting_example, available on the ComfyUI example page.
- Functionality:
- Inpainting: Use a mask and prompt to fill in missing areas of an image.
- Outpainting: Expand an image’s borders while maintaining its style and content.
2. Using FLUX.1 Redux Adapter
This adapter is ideal for creating image variations:
- Simply input an image, and the model generates visually similar alternatives.
- No prompt required, making it quick and intuitive.
3. Leveraging ControlNet Models
- Depth Conditioning: Input a depth map to achieve realistic depth-aware outputs.
- Canny Edge Conditioning: Utilize edge maps for detailed and structured image generation.
- LoRA models enhance both depth and edge conditioning workflows, allowing for greater customization.
Why Use Black Forest Labs Models with ComfyUI?
ComfyUI’s modular node-based system makes it the perfect platform for incorporating advanced models like those from Black Forest Labs. With FLUX.1 integrations, users gain:
- Precision Control: Adjust specific details, edges, and depths with unparalleled accuracy.
- Enhanced Creativity: Perform complex tasks like inpainting, outpainting, and structured image generation effortlessly.
- Flexibility: Work seamlessly with diverse inputs, including masks, depth maps, and edge maps.
By combining these innovative tools with ComfyUI’s intuitive interface, creators can push the boundaries of AI-generated art, achieving results that were previously out of reach.
For a detailed walkthrough and examples, check out the official ComfyUI example workflows and documentation. Dive in today to experience the future of AI-driven creativity!
FLUX.1 Redux
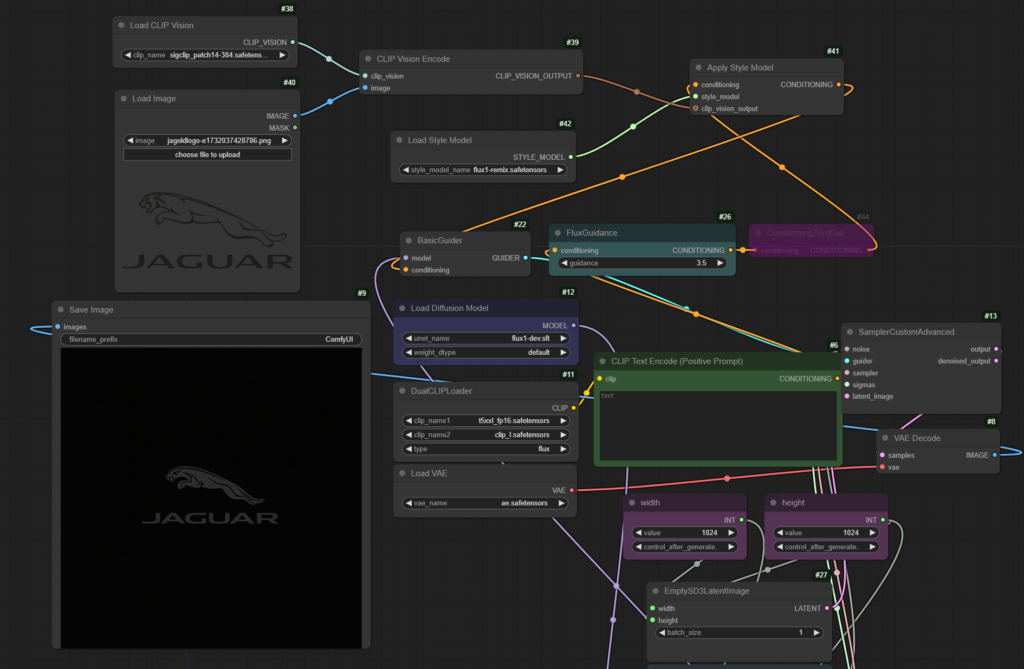
The FLUX.1 Redux model is a versatile and lightweight tool designed for generating image variations effortlessly. Perfect for quickly replicating styles, color palettes, and compositions, Redux works seamlessly with both Flux.1 [Dev] and Flux.1 [Schnell] workflows.
Key Features of Redux
- Input: An existing image. No text prompt is required, making it ideal for straightforward and efficient use.
- Output: A series of variations that stay true to the input image’s style, maintaining its essence in terms of color palette, composition, and overall visual coherence.
Whether you’re looking to explore creative options or refine an image’s stylistic elements, Redux offers a streamlined solution.
Getting Started with Redux in ComfyUI
To use Redux effectively, follow these steps:
1. Update ComfyUI
Ensure you’re using the latest version of ComfyUI for full compatibility.
2. Download the Necessary Files
- sigclip_patch14-384.safetensors: Save this file to the
ComfyUI/models/clip_visionfolder. - flux1-dev model: Place this model in the
ComfyUI/models/unetdirectory. - Redux Model: Save the Redux model in the
ComfyUI/models/style_modelsdirectory.
3. Load Remix Workflows
Visit the example workflows page and download the Remix workflows. Drag and drop the workflow into ComfyUI to get started quickly.
Why Choose Redux?
The Redux model is perfect for:
- Style Preservation: It creates variations that remain true to the style and structure of the input image, making it ideal for artists and designers.
- Speed and Efficiency: No prompts are needed, simplifying the workflow and reducing the time required to achieve desired outputs.
- Integration Flexibility: Works with both “Dev” and “Schnell” Flux.1 workflows, catering to diverse use cases.
Enhancing Creativity with Redux in ComfyUI
Redux thrives within ComfyUI’s intuitive, node-based ecosystem, giving users precise control over their creative process. With its focus on style preservation and ease of use, Redux is a powerful addition to any image generation workflow.
For more details and example workflows, explore ComfyUI’s official documentation. Dive in and experience the simplicity and power of FLUX.1 Redux today!
ControlNets
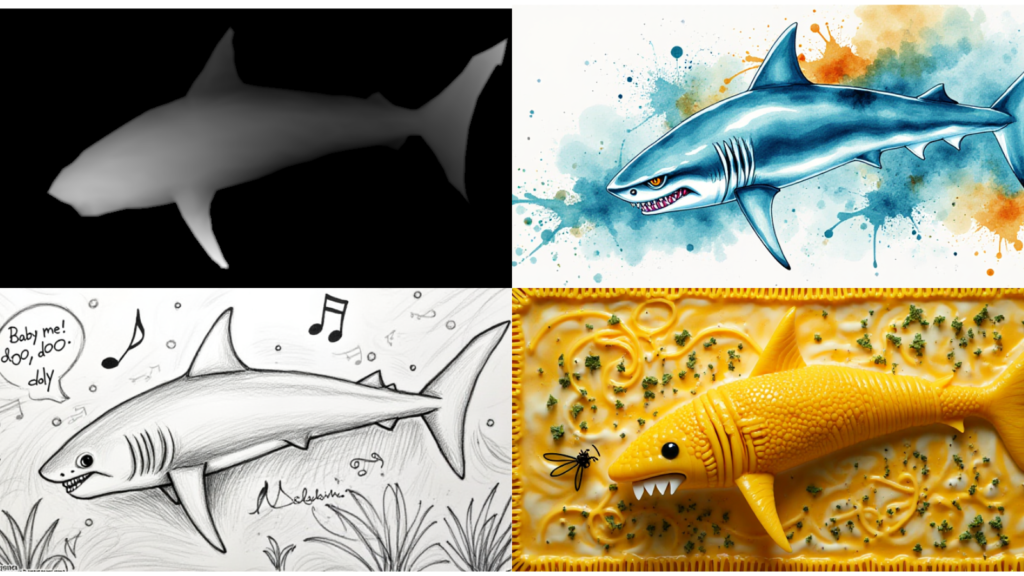
ControlNet enhances image generation by incorporating additional conditioning data, such as depth maps and edge maps. Here’s what makes it a game-changer:
Types of ControlNet Models
- Depth Model
- Purpose: Guides the perspective and structure of the output image.
- Conditioning Input: A depth map (e.g., 3D-like spatial data of an image).
- Canny Model
- Purpose: Focuses on outlines and shapes by leveraging edge maps.
- Conditioning Input: A Canny edge map, defining the contours of the image.
Inputs Required
- Base Image: An initial image to be used as a starting point or guide.
- Text Prompt: A description to define the creative direction of the generated image.
- Depth or Canny Edge Map: Depending on the model, provide the appropriate map to enforce structural conditioning.
Output
- A refined, AI-generated image that adheres to the structure dictated by the depth or edge map while following the text prompt’s creative intent.
Getting Started with ControlNet Models in ComfyUI
- Update Your ComfyUI Setup
Ensure you have the latest version of ComfyUI to utilize ControlNet models fully. - Download Required Files
- Depth or Canny Models: Save these models to the
ComfyUI/models/controlnetfolder. - Flux.1 [Dev] or Schnell] Workflows: Optional for further integration.
- Depth or Canny Models: Save these models to the
- Prepare Your Inputs
- Use tools to generate depth maps or Canny edge maps for your base image.
- Craft a descriptive text prompt to define the image’s theme.
- Insert a ControlNet Node in ComfyUI
- Drag and drop the appropriate ControlNet node (Depth or Canny) into your workflow.
- Connect your inputs and configure the parameters as needed.
- Generate the Image
Run the workflow to create an image that blends creative freedom with precise structure.
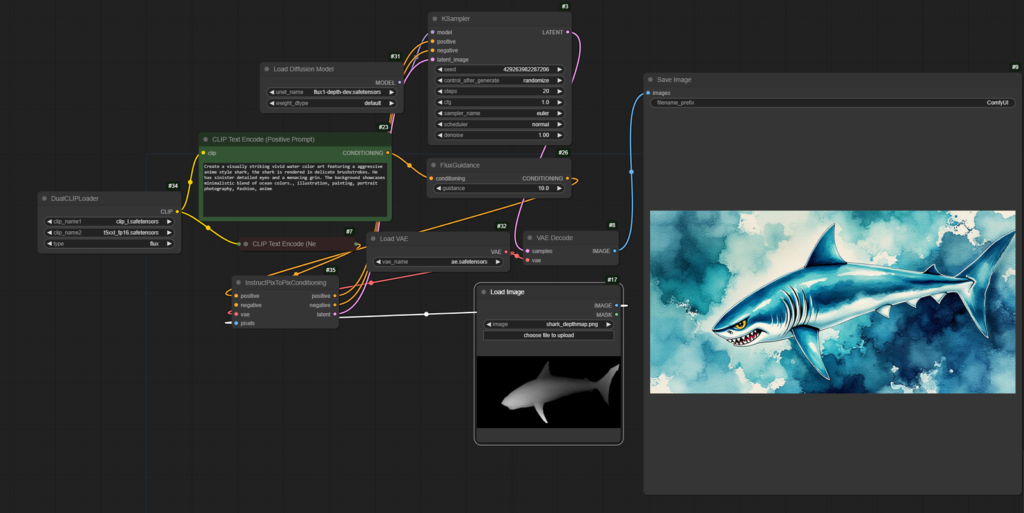
ComfyUI Dev Tem will continue to refine and improve these example workflows based on community feedback.
Enjoy your creation!
Read related articles in our Blog.
