Welcome to this beginner-friendly guide to ComfyUI! Whether you’re new to AI art or an experienced creator, this tool can help you push the boundaries of your creativity. In this guide, we’ll explore what makes ComfyUI stand out, walk you through its core features, and provide step-by-step insights to get you started on your journey to creating beautiful AI-generated art.
What is ComfyUI?
ComfyUI is a powerful, node-based graphical user interface (GUI) that enhances the art generation process by utilizing Stable Diffusion, a state-of-the-art deep learning model. With ComfyUI, you’re not just creating art; you’re designing custom workflows that give you precise control over every aspect of the image generation process.
Imagine a canvas where each element of the process—text encoding, image generation, and more—is represented by different nodes. These nodes can be connected in various ways, allowing you to fine-tune your approach and achieve stunning, AI-generated images.
ComfyUI’s node-based interface may seem technical at first, but it’s incredibly intuitive once you get the hang of it. Think of it as creating a visual recipe for your masterpiece, where you decide which ingredients to include and how they interact.
ComfyUI vs. AUTOMATIC1111
You might be familiar with AUTOMATIC1111, the default GUI for Stable Diffusion. How does ComfyUI compare?
Benefits of ComfyUI:
- Lightweight: It runs efficiently and loads quickly.
- Flexible: Offers extensive customization options.
- Transparent: Provides clear visibility of the data flow in your workflow.
- Easy to share: Workflows can be saved as files and shared for reproducible results.
- Prototyping: You can create and experiment with workflows without writing code.
Drawbacks of ComfyUI:
- Interface inconsistency: The appearance of workflows can vary depending on how nodes are arranged.
- Overly detailed: For some users, the level of control might be overwhelming, as not everyone needs to know how every element interacts.
Getting Started with ComfyUI
The best way to learn ComfyUI is by diving right in! We’ll guide you through a basic text-to-image workflow, explain how to set up nodes, and explore some of ComfyUI’s key features.
ComfyUI Workflows: Text-to-Image
One of the simplest workflows in ComfyUI is generating an image from text. In this process, you provide a text prompt, and the system generates a corresponding image.
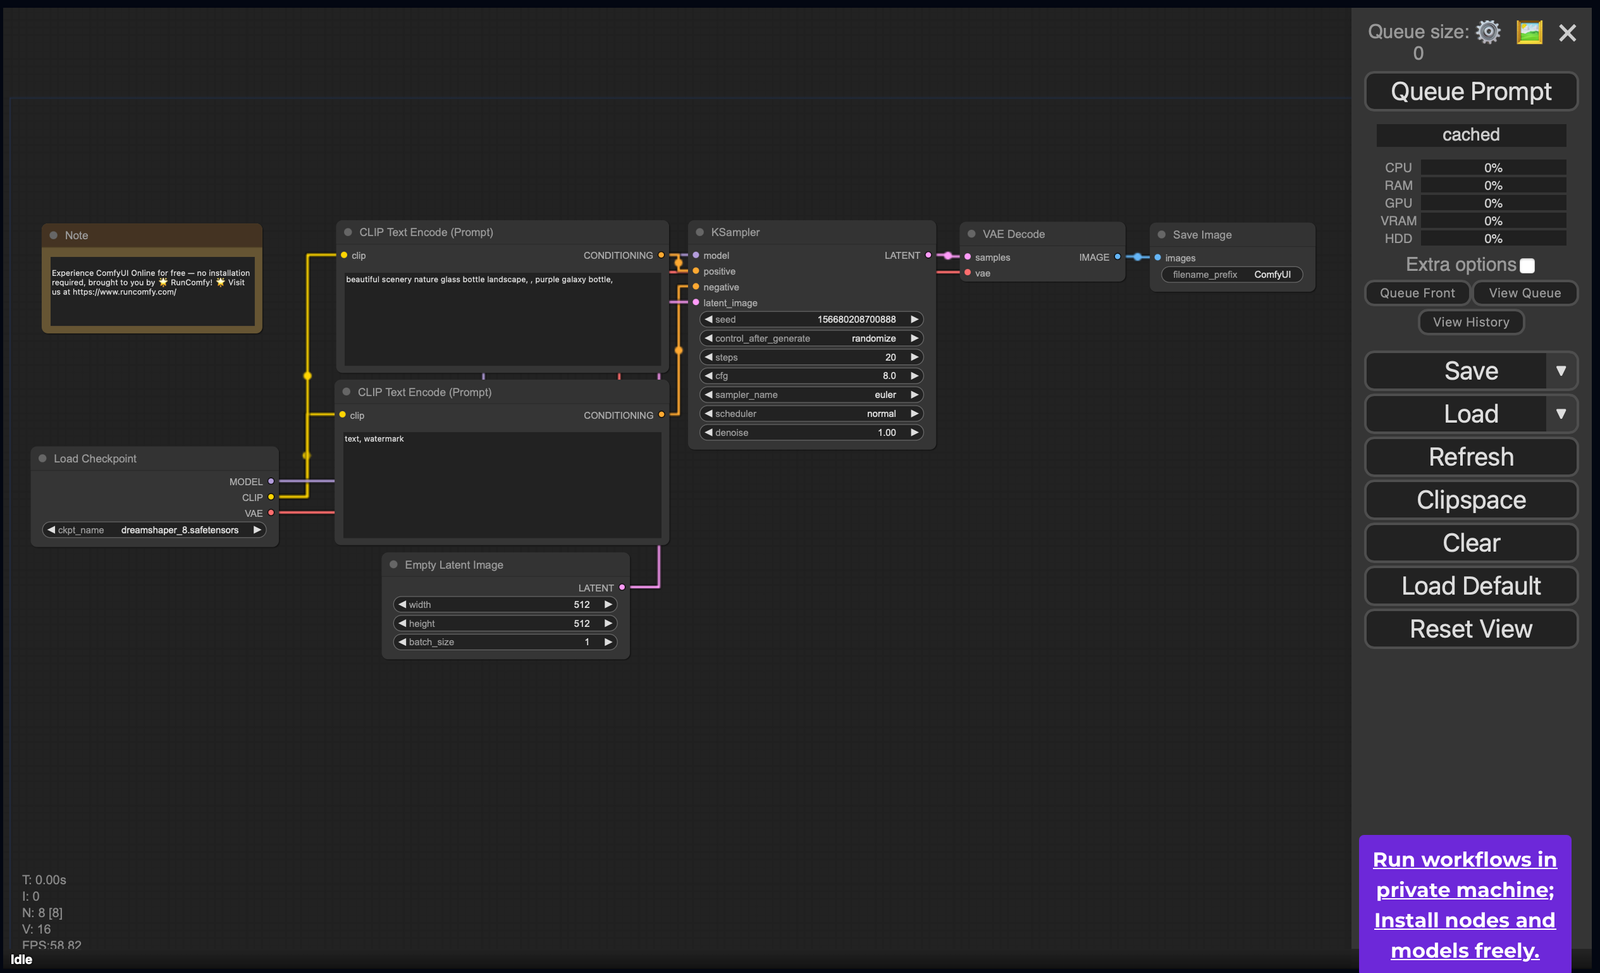
The workflow consists of nodes like Load Checkpoint, Clip Text Encoder, and KSampler, which work together to create the final artwork.
Basic Controls in ComfyUI
Before diving into the workflow, it’s important to familiarize yourself with some basic controls:
- Zoom in/out: Use the mouse wheel or a two-finger pinch to zoom.
- Connect nodes: Drag from the input or output dots on nodes to connect them.
- Move the workspace: Click and drag with the left mouse button.
Key Workflow Components
Let’s dive into the details of this workflow. Key ComfyUI Workflow Components listed below:
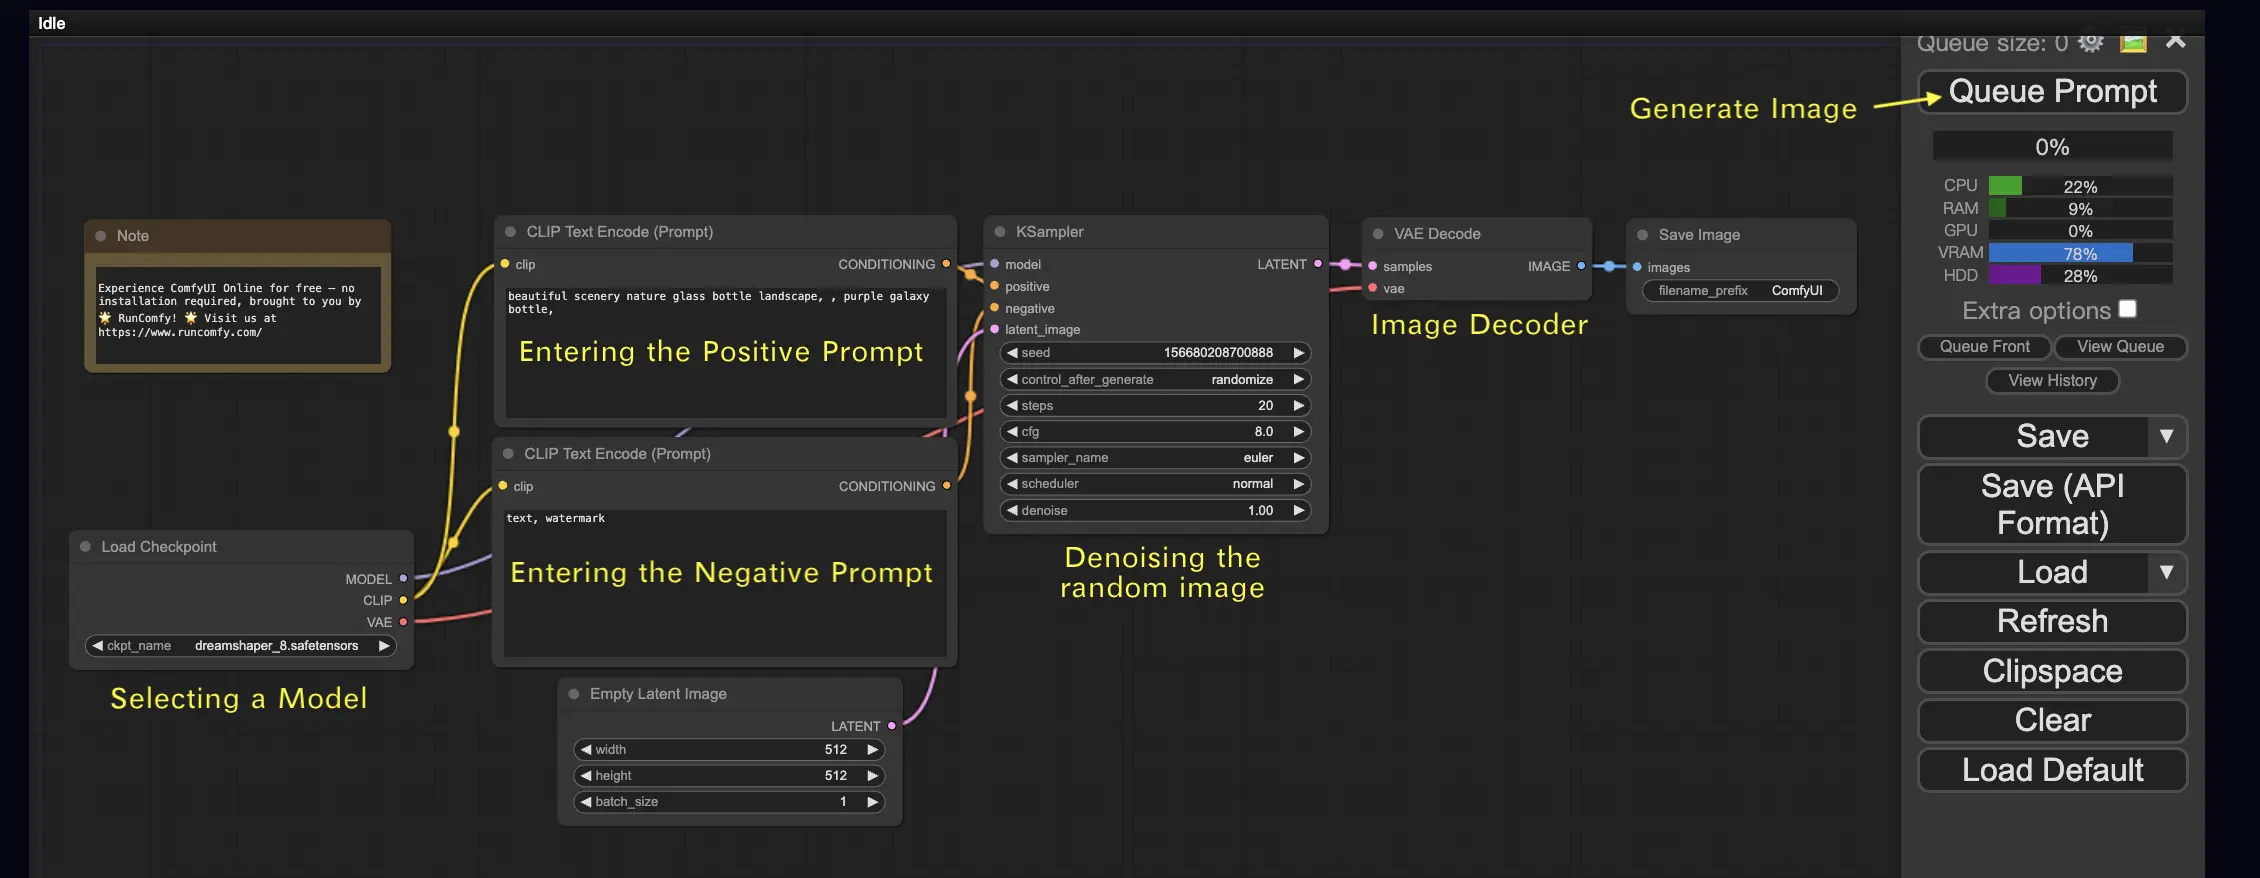
- Load Checkpoint Node: This node loads a Stable Diffusion model. A model consists of three main components:
- MODEL: The core image generator that works in the latent space.
- CLIP: A language model that converts text into a form the generator understands.
- VAE: Handles the conversion between pixel and latent spaces.
- CLIP Text Encode Node: This node processes your text prompt by transforming it into embeddings that guide the image generation process.
- KSampler Node: This is where the image generation magic happens. It denoises a random latent image, refining it into a detailed final product.
Steps to Generate an Image
- Selecting a Model: Start by selecting a Stable Diffusion model in the Load Checkpoint node.
- Input Prompts: Enter a positive prompt (what you want in the image) in the top CLIP Text Encode node, and if desired, a negative prompt (what you don’t want) in the bottom one.
- Run the Workflow: Once the nodes are set, click Queue Prompt, and in a few moments, you’ll see your first generated image!
Understanding the Stable Diffusion Process
To truly harness the power of ComfyUI, it helps to understand the broader process behind image generation with Stable Diffusion. The entire workflow is based on the following three steps:
- Text Encoding: The input prompt is processed into word vectors by a text encoder.
- Latent Space Transformation: These vectors guide the transformation of random noise in the latent space into an intermediate image.
- Image Decoding: The latent image is then decoded back into the pixel space, creating the final artwork.
Essential Nodes in ComfyUI
Load Checkpoint Node
This node is key for loading a Stable Diffusion model, which includes the MODEL (image generator), CLIP (text processor), and VAE (latent-to-pixel converter). The MODEL generates images, while CLIP processes text prompts, and the VAE handles the final conversion of the image from latent to pixel space.
CLIP Text Encode
This node transforms text into embeddings that the Stable Diffusion model uses to guide the image generation. By adjusting prompt weights (e.g., using (keyword:1.2)), you can influence how much emphasis is placed on specific words in your prompt.
Empty Latent Image
The image generation starts with a random image in the latent space. You can control the size of this latent image (which affects the final image size) and the number of images generated per run. For example, the default size for a Stable Diffusion model might be 512×512 or 768×768, depending on the model.
VAE (Variational AutoEncoder)
The VAE plays a crucial role in converting images between pixel space and latent space. It compresses an image into a more manageable latent representation for faster processing. The VAE Decoder reconstructs the final image from the latent space.
KSampler
This node is where the magic happens in Stable Diffusion. It takes the initial random latent image and progressively refines it based on the text prompt. The KSampler offers various controls like:
- Seed: For reproducibility.
- Step Count: For controlling the detail in the final image.
- Sampler: Choose different algorithms for how the model refines the image.
Adjusting these settings allows you to fine-tune the generated artwork.
Advanced Workflows: Image-to-Image
ComfyUI also supports image-to-image workflows, where you provide an input image, and the system transforms it based on a prompt. The steps are similar to the text-to-image workflow but offer more control over how much of the original image is preserved through the denoise parameter.
ComfyUI SDXL
Thanks to its high level of configurability, ComfyUI is one of the first GUIs to support the Stable Diffusion XL model. Let’s explore it!
- Run workflows on a private machine; install nodes and models freely.
- To use the ComfyUI SDXL workflow:
- Revise the positive and negative prompts.
- Press “Queue Prompt” to start generation.
ComfyUI Inpainting
Let’s delve into something more advanced: inpainting! If you have a great image but want to modify specific parts, inpainting is an ideal method. Here’s how you can try it below:
- Run workflows on a private machine; install nodes and models freely.
- To use the inpainting workflow:
- Upload the image you want to inpaint.
- Right-click the image and select “Open in MaskEditor.” Mask the area you wish to regenerate, then click “Save to node.”
- This workflow works with a standard Stable Diffusion model, not an inpainting model.
- If using an inpainting model, switch the “VAE Encode” and “Set Noise Latent Mask” nodes to the “VAE Encode (Inpaint)” node, specifically designed for inpainting models.

Customize the inpainting process by adding details in the CLIP Text Encode (Prompt) node to guide the inpainting. For example, specify the style, theme, or elements you want in the inpainted area. Adjust the original denoising strength (e.g., set it to 0.6) and press “Queue Prompt” to start.
ComfyUI Outpainting
Outpainting is another fascinating technique that lets you expand your images beyond their original boundaries, giving you an extended canvas to work with.
- Run workflows on a private machine; install nodes and models freely.
- To use the ComfyUI Outpainting workflow:
- Start with an image you’d like to expand.
- Add the Pad Image for Outpainting node to your workflow.
Configure outpainting settings by specifying the number of pixels to expand (left, top, right, bottom). You can adjust the feathering to control the smoothness of the transition between the original image and the outpainted area. Higher values provide smoother transitions but may introduce some smudging.

Customize the outpainting process by adding specific details in the CLIP Text Encode (Prompt) node. You can specify the style, theme, or elements for the expanded area. For best results, experiment with different prompts and fine-tune the VAE Encode (for Inpainting) node by adjusting the grow_mask_by parameter (a value greater than 10 is recommended). Press “Queue Prompt” to begin the process.
ComfyUI Upscale
Next, let’s explore ComfyUI’s upscaling capabilities. Here, we introduce three fundamental workflows to help upscale images efficiently.
- Run workflows on a private machine; install nodes and models freely.
- Two main methods for upscaling are:
- Upscale pixel: Directly enlarges the visible image.
Input: image; Output: upscaled image. - Upscale latent: Upscales the latent space (invisible).
Input: latent; Output: upscaled latent (requires decoding to become visible).
Upscale Pixel
There are two ways to achieve pixel upscaling:
- Using algorithms: This is faster but may result in slightly lower quality.
- Using models: This gives better results but takes more time.
Upscale Pixel by Algorithm

- Add the Upscale Image by node.
- Select the upscaling method (e.g., bicubic, bilinear, nearest-exact).
- Specify the scaling factor (e.g., 2x).
Upscale Pixel by Model
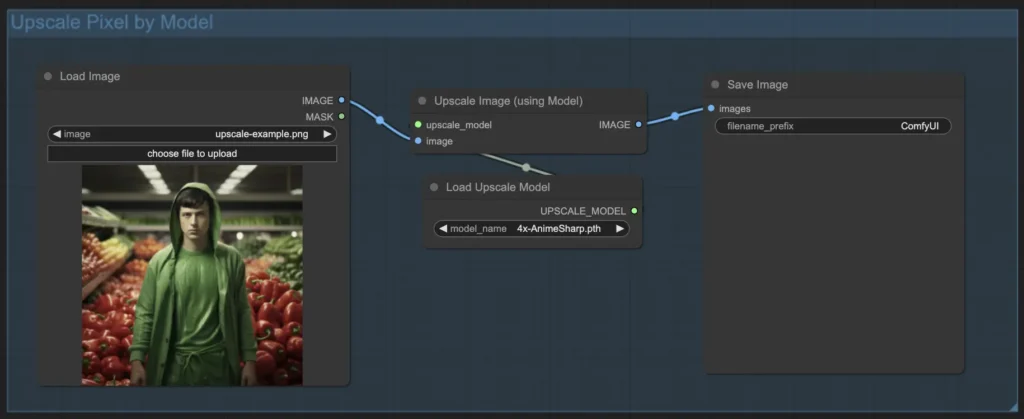
- Add the Upscale Image (using Model) node.
- Add the Load Upscale Model node.
- Choose a model suited for the image type (e.g., anime or real-life) and select the upscaling factor (2x or 4x).
Upscale Latent
Another method is Upscale Latent, also known as Hi-res Latent Fix Upscale. This method directly upscales within the latent space.

Upscale Pixel vs. Upscale Latent
- Upscale Pixel: Enlarges the image without adding new details. It is faster but may result in a slight smudging effect and fewer details.
- Upscale Latent: Not only enlarges but also enriches details, though it may deviate from the original image. This method is slower.
ComfyUI ControlNet
Take your AI art to the next level with ControlNet, a groundbreaking tool that transforms the way images are generated. ControlNet offers an incredible level of control over your AI creations, working seamlessly with powerful models like Stable Diffusion.
With ControlNet, you can guide image creation by defining edges, human poses, depth, or even segmentation maps, giving you the power to shape your results with precision.
For more detailed instructions, check out our comprehensive tutorial on mastering ControlNet in ComfyUI. It’s packed with step-by-step guidance and inspiring examples to help you become an expert.
ComfyUI Manager
ComfyUI Manager is a custom node that lets you install and update other custom nodes directly within the ComfyUI interface. You’ll find the Manager button in the Queue Prompt menu.
Installing Missing Custom Nodes
If your workflow requires custom nodes you haven’t installed, follow these steps:
- Click “Manager” in the menu.
- Select “Install Missing Custom Nodes.”
- Restart ComfyUI and refresh your browser.
Updating Custom Nodes
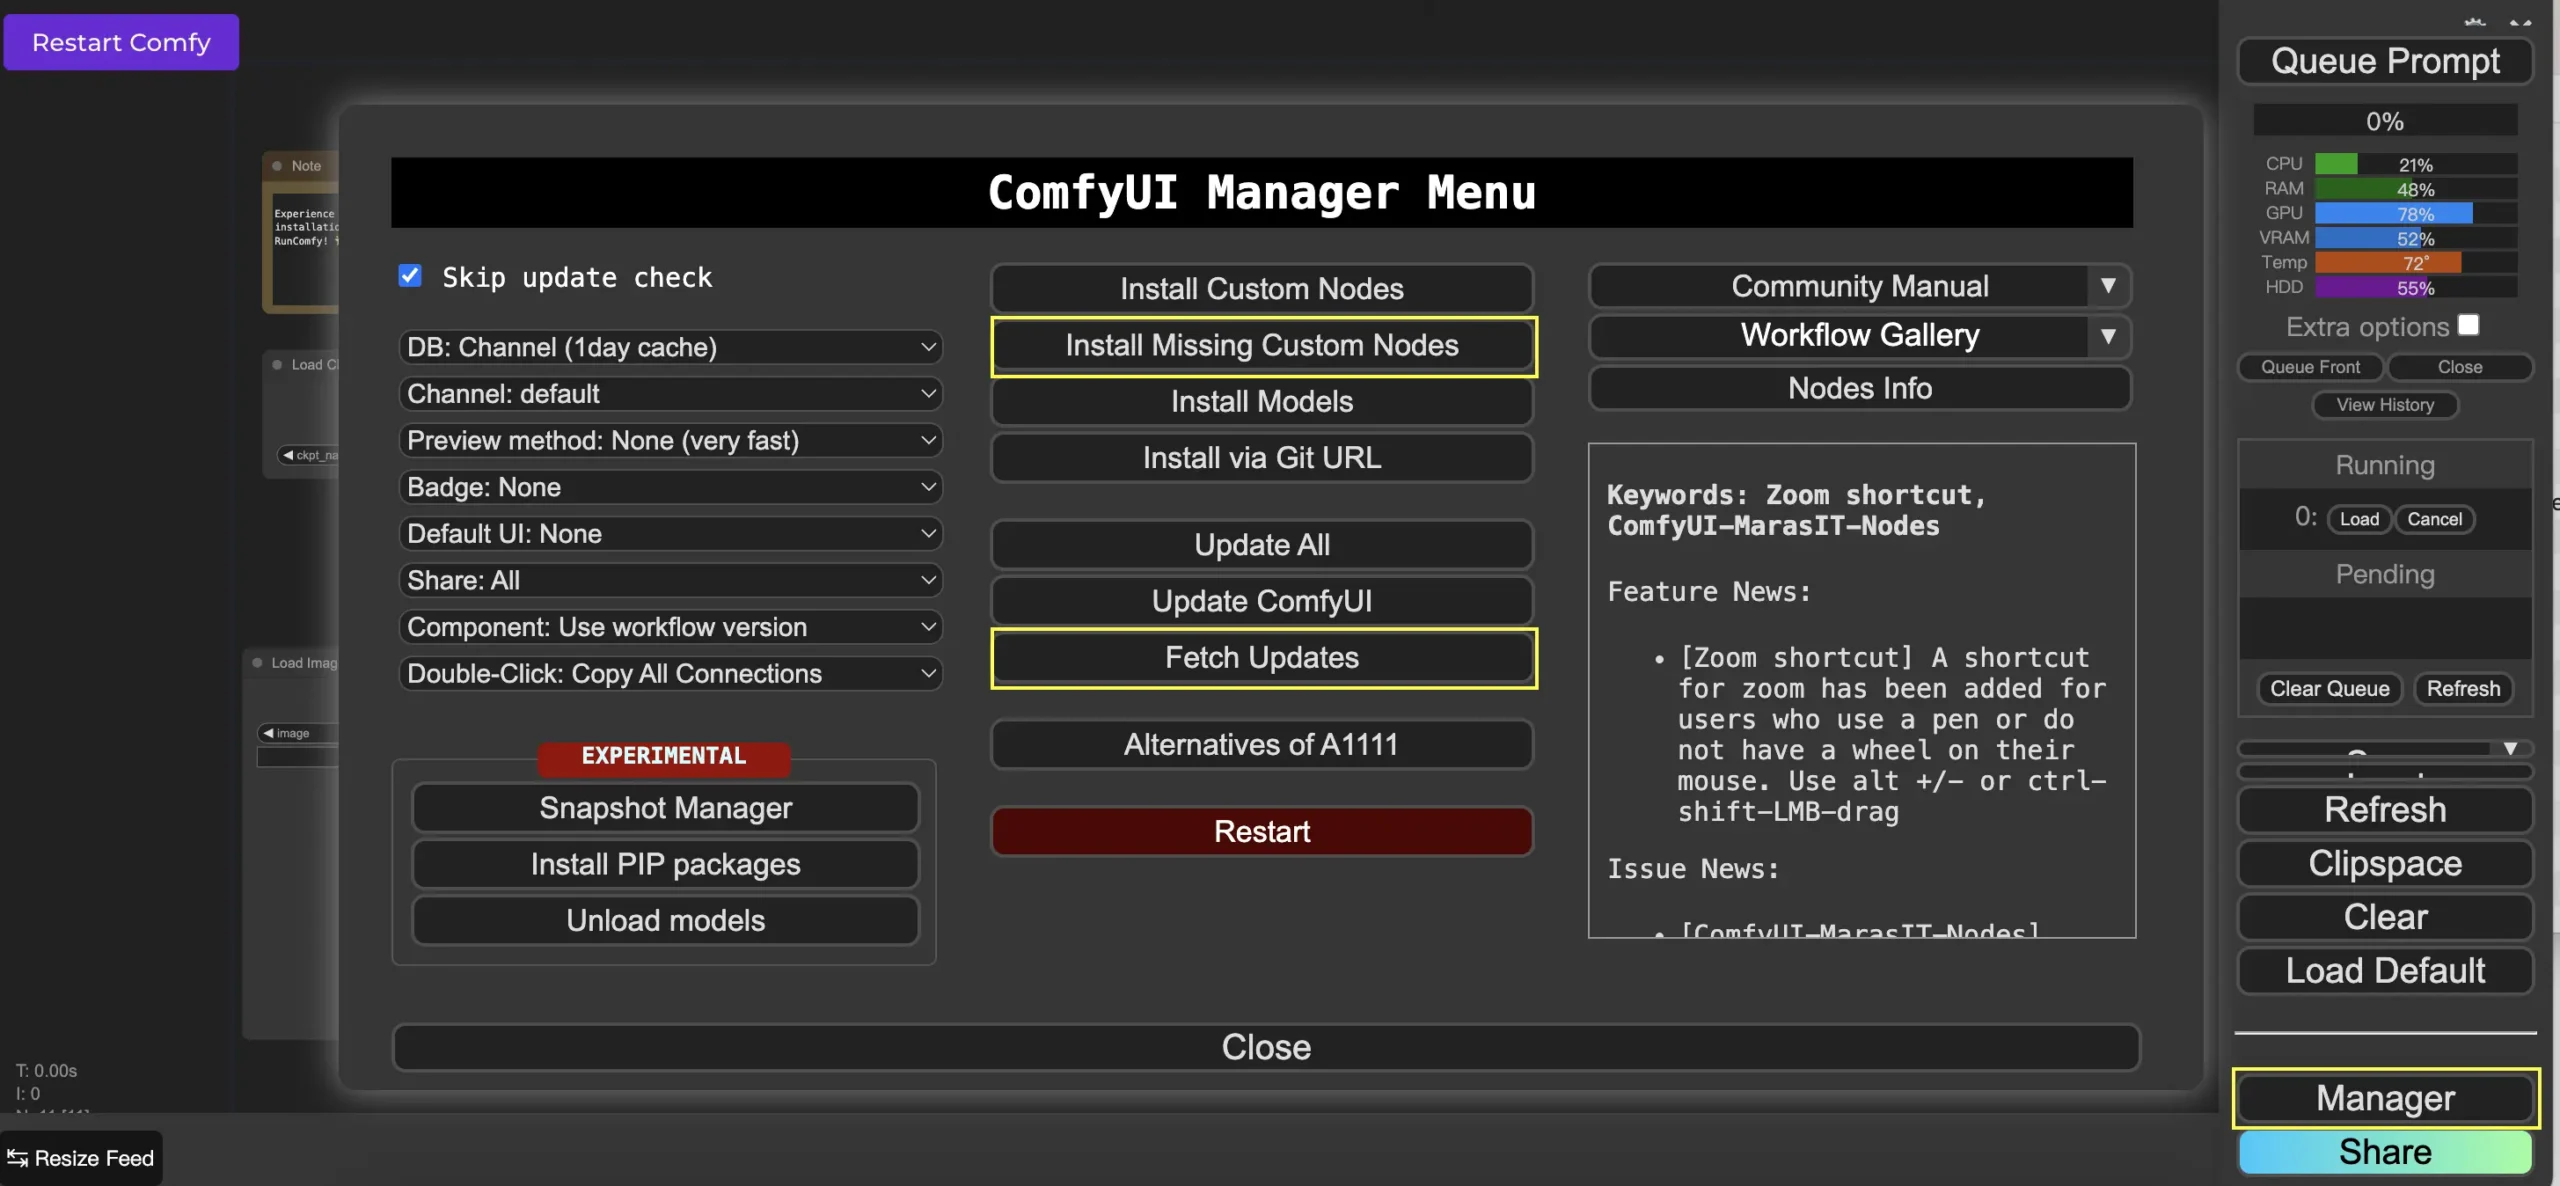
To update custom nodes:
- Click “Manager” in the menu.
- Select “Fetch Updates” (this may take some time).
- Click “Install Custom Nodes.”
- If an update is available, an “Update” button will appear next to the node.
- Click “Update” and restart ComfyUI.
Loading Custom Nodes in Your Workflow
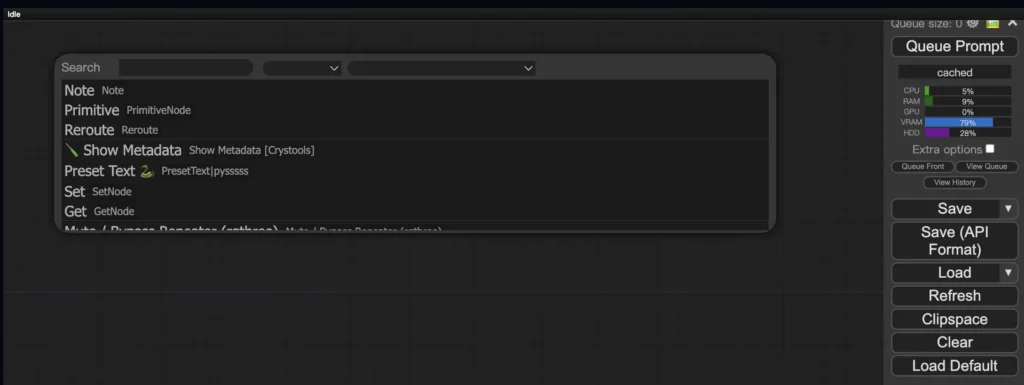
To load custom nodes, double-click any empty area in your workflow to bring up the node search menu.
ComfyUI Embeddings
Embeddings, or textual inversion, allow you to introduce custom concepts or styles into your AI-generated images. It’s like teaching the AI new “words” to associate with specific visuals.

To use embeddings, type “embedding:” followed by the name of the embedding in the positive or negative prompt box. For example:
- embedding: BadDream
ComfyUI will search for the corresponding embedding file and apply its characteristics to the generated image. You can also create your own embeddings by training them on a set of images that represent the concept or style you want.
Embedding with Autocomplete
If you have a large collection of embeddings, remembering their exact names can be difficult. ComfyUI’s custom script node makes it easier by offering autocomplete functionality. To enable it:
- Open “Manager” from the top menu.
- Install the “ComfyUI-Custom-Scripts” node.
- Restart ComfyUI.
Once installed, you can type “embedding:” and a list of available embeddings will appear for easy selection.
Adjusting Embedding Weight
You can control the strength of your embeddings by assigning weights to them, much like regular keywords in prompts. To adjust, use the following format:
- (embedding: BadDream:1.2)
Higher weights (e.g., 1.2) make the embedding more prominent, while lower weights reduce its influence, allowing for greater control over the final result.
ComfyUI LoRA
LoRA (Low-rank Adaptation) is a feature that enables you to fine-tune checkpoint models, allowing for more precise control over styles and specific elements in your AI-generated images. LoRA models are compact, making them easy to use and share.
When applied, LoRA modifies the MODEL and CLIP components without affecting the VAE, allowing for changes in content and style without altering the structure of the image.
Using LoRA
To use LoRA in ComfyUI:
- Select a checkpoint model for image generation.
- Choose a LoRA model to modify the style or elements.
- Adjust the prompts as needed.
- Press “Queue Prompt” to generate the image with the LoRA modifications.
Applying Multiple LoRAs
You can apply more than one LoRA to a single image. ComfyUI allows you to select multiple LoRA models in the same workflow, and it will apply them sequentially. This offers creative flexibility, enabling the combination of different styles or elements.

Read more about LoRa in the article.
Shortcuts and Tricks for ComfyUI
Copy and Paste
- Copy a node with Ctrl+C.
- Paste with Ctrl+V.
- Use Ctrl+Shift+V to paste with input connections intact.
Moving Multiple Nodes
- Group nodes to move them together, or hold Ctrl and drag to select multiple nodes.
- Move selected nodes by holding Shift while dragging the mouse.
Bypass a Node
- Mute a node by selecting it and pressing Ctrl+M.
- To mute a group, use the “Bypass Group Node” option in the right-click menu.
Minimize a Node
- Click the dot in the top left corner to minimize any node.
Generate Image
- Press Ctrl+Enter to queue the workflow and generate images.
Embedded Workflow
- ComfyUI saves the entire workflow in the metadata of the PNG files it generates. Drag and drop the image back into ComfyUI to reload the workflow.
Fix Seeds to Save Time
- ComfyUI only reruns nodes when the input changes. Save time by fixing the seed to avoid regenerating results upstream in the workflow.
ComfyUI Online
Congratulations on completing this beginner’s guide to ComfyUI! You’re now equipped to dive into the exciting world of AI art creation. To make things even easier, you can use ComfyUI online through RunComfy, where you’ll have access to over 200 nodes and models, along with more than 50 ready-to-use workflows. No installation is required—just start creating!
